
7-Day Ketogenic Diet Meal Plan And Menu
This is a detailed meal plan for the ketogenic, a high-fat, low-carbohydrate diet . Its benefits, how to get started, what to eat, what not to eat and a sample ketogenic diet plan and menu for one week.
Table of contents
Benefits of Ketosis
Getting Started
Additional Points of Interest
Foods Recommended on a Ketogenic Diet
Foods to Avoid on a Ketogenic Diet
7 Day Ketogenic Diet Meal Plan
Monday
Tuesday
Wednesday
Thursday
Friday
Saturday
Sunday
Eating Low Carb Doesn’t Mean Flavorless “Diet” Food
You’ve probably heard about the low carb, high fat diet that’s so popular among actors and models, and with good reason: low carb diets offer proper nourishment with whole foods, while keeping your body burning fat for fuel.
This is a great way to be, as it makes fat loss largely effortless! But where does this “ketogenic” word fit into the picture?
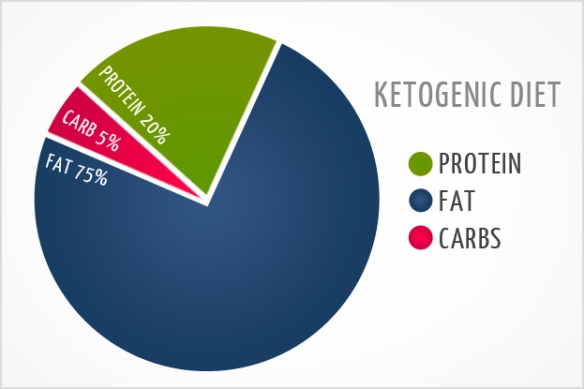
Well, ketogenic comes from the word “ketosis”, which is a state in which your body breaks down fat molecules into ketones to provide energy.
This state is achieved through very low carbohydrate intake and higher than normal fat intake. The “normal” state of the body’s metabolism is called “glycolysis”, where carbs are burnt for energy.
The long and short is that when your body is in carb-burning mode, it will use all available carbs for energy before it touches stored fat.
In ketosis, your body is primed to burn fat, and this is great news for anyone trying to get trim and slim.
Benefits of Ketosis
By cutting carb intake significantly, we can drastically reduce insulin resistance, the precursor to type 2 diabetes.
In addition, low carb diets, along with exercise, can be very effective at helping alleviate the symptoms and progression of type 2 diabetes.
Beyond that, ketosis itself is appetite-suppressing, meaning your hunger will naturally check itself, increasing your caloric deficit and making you lose fat even faster. (You can find out more about ketosis benefits here).
Getting Started
Ketosis takes some time to get into – about two weeks of low carb eating is required for the initial adaptation.
During this time there will be bouts of sluggishness, fatigue, headaches, and some gastrointestinal issues as you adapt, often referred to as “keto flu”.
Proper electrolyte intake will correct most of these issues. In addition, the “diet” aspect of this ketogenic meal plan – that is, the caloric restriction – shouldn’t be worried about.
Weight loss will come as your body regulates appetite as it the addiction to sugar and processed food lessens, so restricting calories during the initial two weeks isn’t recommended.
The meal plan is designed to ensure you get three balanced, healthy meals a day that address fiber, satiation, and adequate protein intake.
The greatest part of a ketogenic diet is the fact that it spares muscle loss, where a carb-based diet doesn’t.
Weight lost in a high carb, calorie-restricted diet will often come both from muscle and fat, whereas with keto, you can burn fat without sacrificing muscle.
This is referred to often as “body recomposition” and leaves you with a much more preferred physique after weight loss.
Additional Points of Interest
Ketogenic diets often create a significant loss of water during the first phases.
This is because carbs are converted to glycogen in your body, which is stored in water within the muscles and liver.
As you deplete stored glycogen, your body flushes this water out. This is a huge part of the initial weight loss during the first few weeks of ketosis.
While rapid fat loss does occur at first, a lot of water weight is often dropped as well, but this is a great encouragement as it often results in both weight loss and less bloating, allowing clothes to fit better.
Foods Recommended on a Ketogenic Diet
Meat: Beef, goat, lamb, turkey, pork, veal, chicken.
Fish: Salmon, trout, catfish, sardines, tuna, haddock and many others.
Fruits: Strawberries, blueberries, raspberries, avocado.
Vegetables: Broccoli, asparagus, Brussels sprouts, cucumbers and many others.
Nuts and Seeds: Almonds, walnuts, sunflower, pumpkin, sesame, etc.
Dairy Products: Cheese, Greek yogurt, sour cream, heavy cream.
Fats and Oils: Peanut Butte, flaxseed oil, butter, sesame oil, olive oil and almond oil.
Foods to Avoid on a Ketogenic Diet
Grains: Grains: Wheat, oats, corn, barley and rye. Includes breads and pastas.
Artificial Sweeteners: Sucralose, Equal, Acesulfame, Splenda, Saccharin, etc.
Processed Foods: If it contains carrageenan, don’t eat it.
“Low-fat” products: Atkins products, drinks, gluten, diet soda, etc.
7 Day Ketogenic Diet Meal Plan
This is a sample menu for one week on a ketogenic diet plan.
Monday
Breakfast: – 3 Egg Omelet with Spinach, Cheese, and Sausage
Eggs are a healthy, nutrient-dense food that has been incorrectly maligned for years.
Cholesterol in food doesn’t increase cholesterol in your blood, so eat eggs liberally – they’re packed with protein and lutein, and they fill you up for hours.
Make a healthy omelet with some cheddar, crumbled breakfast sausage, and shredded spinach and you’re already looking at over 30g of protein, just for breakfast!
Spinach is a great source of magnesium and potassium, too.
Add some sea salt and you’ve got a big dose of electrolytes that are so vital to maintaining energy and staving off headaches.
Lunch – BLT Salad
Take a 2 – 3 cups of lettuce, crumble in some bacon and dice a medium tomato.
Mix that with two or three tablespoons of mayo, and toss after adding some splashes of hot sauce.
Delicious, filling, full of fiber and healthy fats, and absolutely easy. I know the mayo sounds weird as a dressing, but trust us; it’s amazing! Add in some avocado chunks to boost potassium too!
Dinner – Baked Salmon with Asparagus
The beauty of salmon is that you can cook it with marginal interference.
A simple sauce of butter, lemon juice, chopped garlic, and some salt and pepper will go a long way to enhancing the natural flavor of the salmon.
Drizzle the sauce over 4-6 oz portions of fish, bake at 450F for 5 minutes per 1/2″ thickness of fish.
In another bowl, toss the asparagus with olive oil, salt, and pepper, spread it out evenly on a cookie sheet, and roast in the oven at 450 for 20 minutes.
Easy dinner (with leftovers if you plan ahead) that’s full of nutrition, protein, and healthy fat, while keeping your carbs low.
Tuesday
Breakfast – Bacon and Eggs
A simple standby, but one that ketoers adore. 2 or 3 fried eggs and some bacon might not sound like much, but it’s full of protein that will keep you full and energized all morning.
Take the opportunity on the weekend to lay your bacon strips on a single cookie sheet and bake in the oven for 20 minutes at 400 degrees.
The result is the best bacon you’ve ever had, in a big batch, with no sitting over a popping, hissing frying pan.
Lunch – Spinach Salad
You’ll quickly find that salads are your friend when in ketosis, and for a good reason: they provide lots of food to fill you up, but they’re not going to bog you down.
A bed of spinach with some red onion, bacon, a little tomato, and a hot sauce vinaigrette is quick and delicious.
Add in some protein – perhaps that leftover salmon from day 1 – and you’ve got a complete, healthy lunch.
Hot sauce vinaigrette – 1/2 cup olive oil, 1/4 cup vinegar, hot sauce to taste – mix together and apply to salad. Eat!
Dinner – Cheese-Stuffed Bunless Burgers
This is pretty easy – cook a couple of fresh beef patties, and then top one in cheese and stack the other on top.
Stick them on a plate and cover in veggies and low carb sauces, and eat with a fork! Who needs the bun?
Wednesday
Breakfast – Eggies
You’ll quickly find that eggs are a staple for breakfast in low carb diets. Eggies are a simple solution for days of healthy breakfasts.
Simply beat 8 eggs in a bowl, add in cheese and vegetables, and pour into muffin tins that have been lined with a strip of bacon.
Cook at 350 for 30 minutes, or until a toothpick stuck in the middle comes out clean. Store in baggies for breakfast for up to 5 days.
Lunch – Cottage Cheese, Walnuts, and Hot Sauce
Bear with me here, because I was skeptical at first, too, but for a quick, delicious meal, you can’t go wrong here.
Conversely, you could use cottage cheese and blueberries, if walnuts and hot sauce aren’t your thing.
Dinner – Meatloaf
A good quality meatloaf needs meat and a binder, and fortunately on keto, we’ve got great options for both.
Using chopped mushrooms and onions as a binder instead of bread crumbs adds flavor and nutrients, and keeps carbs down. Add a veggie side and you’re all set!
Thursday
Breakfast – Eggies
You’ve got them – why not sleep in today, knowing breakfast is covered?
Lunch – Tuna Salad Lettuce Wraps
Making a tuna salad with low carb ingredients is easy and delicious, doubly so when you chop up some fresh avocado into said salad.
Using sheathes of endive or romaine lettuce to transport and eat the salad is even better!
Dinner – Slaw Hash
Shred a head of cabbage, and cook with onions, ground beef, soy sauce, red pepper flakes, butter, and garlic.
Sounds weird, but it’s so good. You could even use leftover chopped up meatloaf here if you have it for even more flavor.
Friday
Breakfast – Eggies and/or Fat Coffee
All the rage now, fat coffee is kind of exactly what it sounds like. Taking a good quality coffee, and blending it with 2 tbsp of grassfed butter, 1-2 tbsp of coconut oil, and stevia or whatever other zero-calorie sweetener and flavors you like.
This coffee greatly boosts energy and suppresses hunger, and it’s frothy and delicious!
Lunch – Spam Fries and Cole Slaw
If you saved some cabbage (uncooked) from last night’s dinner, make a simple slaw using low carb ingredients, and chop up some spam into fry-like sections, and fry them up in a frying pan, or bake them for 20 minutes at 350. Serve with ranch or low carb ketchup!
Dinner – Tacos
Use your favorite taco recipe, cook up some beef, and use romaine for shells. Add in some full fat sour cream and cheese, and you’ll never miss the tortillas.
Caution here, though, as store-bought taco seasoning is often very carby. Check labels!
Saturday
Breakfast – Eggies
Lunch – Taco Salad
Take your leftover tacos and make a huge taco salad. Top with salsa and sour cream, and some shredded cheese. Fat, protein, and veggies will fill you up all day!
Dinner – Pork Roast and Roasted Veggies
A nice pork roast, rubbed down with cumin, salt, and garlic, will give you leftovers for days, tastes amazing, and is pretty cheap.
Pair that with some brussels sprouts, broccoli, or cauliflower that has been roasted in the oven until brown and delicious, and you’ve got a comfort meal, keto-style!
Sunday
Breakfast – Avocado-Baked Eggs
Cut an avocado in 2, crack an egg in the seed hole, and bake until the egg is set. Breakfast in the time it takes you to shower!
Lunch – Chicken and Hummus Lettuce Wraps
Deli sliced chicken, spread with savory hummus and wrapped up in butter lettuce, is a quick, healthy lunch that provides a protein punch and without a ton of calories.
Dinner – Philly Cheesesteak Casserole
Using your leftover pork roast, mix with sliced onions and peppers, cream cheese, and shredded cheddar, and bake in the oven for 30 minutes at 350.
Delicious, easy, and hearty, this meal is a crowd favorite, even if they’re not into low carb living!
Eating Low Carb Doesn’t Mean Flavorless “Diet” Food
The best part of low carb eating is that you can still have rich, savory foods – dieting isn’t really a part of the lifestyle.
Your body regulates your hunger naturally, so keeping your carbs low is the main concern.
Being able to do that while still enjoying roast, fish, and big, healthy salads is what makes low carb so easy to stick with, and keep the weight off for good.
If you need help on your Keto (Low Carb) journey, please feel free to visit my online support group. Ask to join by clicking this link https://www.facebook.com/groups/healthycafe/
 can only expect so much!


